![]()
This page is to document the events of the Prologue visually through screenshots. The images in this gallery are presented in chronological order (left-to-right, top-to-bottom). If you have image(s) you want to add to the gallery, let the Community Admins know in the Discussion page.
| This image comes from The Blackout Club or from websites created and owned by Question LLC or Question LLC, who hold the copyright of The Blackout Club. All trademarks and registered trademarks present in the image are proprietary to Question LLC. For more information, see the copyright notice. The use of images to illustrate articles concerning the subject of the images in question is believed to qualify as fair use under United States copyright law, as such display does not significantly impede the right of the copyright holder to sell the copyrighted material. |
Part I

Bells' Bedroom.

Bells' Smartphone on her desk.

Hi-Five Bot

Bells' phone booting up.
View view outside the window at the end of the hallway by Bells' bedroom door.
The view down the hallway from Bell's bedroom door.
The Office
Parents' Bedroom
The Living Room
The Living Room and Upstairs Hallway
Bells taking her parents' video call
The Kitchen (left) and Living Room
Some of the neighborhood in front of Bells House
The Living Room
The Kitchen
The walk to the TV from the Kitchen.
The TV in the Family Room.
The TV in the Family Room.
The video on screen after fixing the TV.
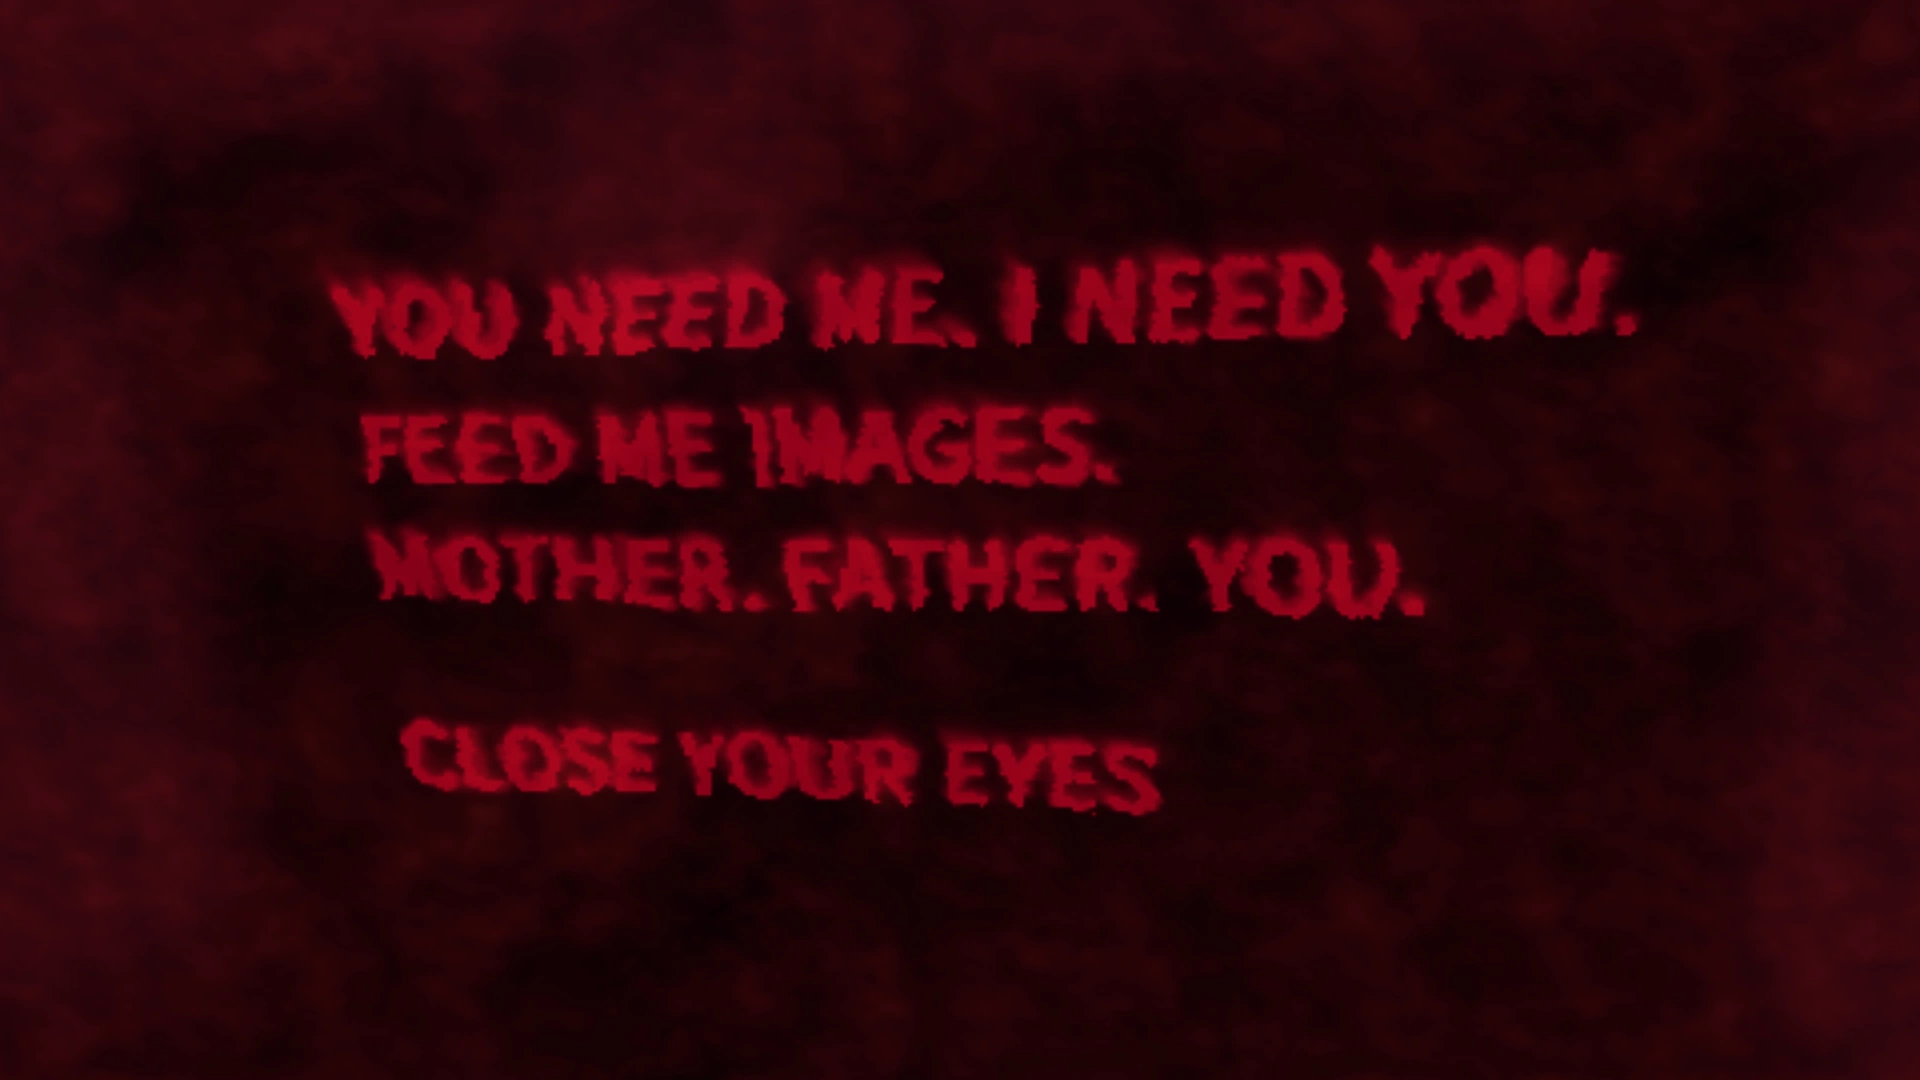
The message when closing your eyes at the TV.
Turning from the TV, the message "IT WAKES" appears on the wall across from the TV when your eyes are closed.
Walking back towards the Kitchen, a mysterious shadow appears for a brief second then ducks behind the wall.
A shadow in the living room, and its source.
Image of mom at the base of the stairs.
The message closing eyes near image of mom.
After collecting the image of mom, the Unity Tree appears
Close-up of the Unity Tree
The Unity Tree and message on the wall. "WE SHALL GROW TOGETHER"
Image of dad in the office.
The message closing eyes near image of dad.
Streamers appear in the living room with the Unity Tree.
The living room with the streamers and Unity Tree.
Image of Bells in the Parents' bedroom.
The message closing eyes near image of Bells.
The invitation found on Bells' bed.
Front of invitation
Back of invitation
Closing her eyes to wake up, the room is covered in text saying "WAKE UP"
Bells waking up in her bed.
Bells grabs her flash drive and phone.
A dirt trail leads out of her room.
The dirt trail leads down the upstairs hallway.
Making the call to dad.
Closing your eyes, the Shape is visible roaming the house.
The dirt trail extends through the living room.
The dirt trail leads into the closet down the hallway by the TV.
Entering the closet, the trail turns into a crawlspace.
A small S curve and into the foundation of the house.
Under the house, turn left to see the tunnel.
Walking down the small tunnel.


Part II
The starting point of Part II.
The monitors showing views of a house interior.
A floorplan is visible, made up of wooden walls and painted rectangles on the floor.
A corridor leading to more rooms.
The Kitchen, where Bells realizes this is her house.
Players enter from the left and make their way up the stairs on the right.
Entering the Family Room.
The view from the top of the stairs.
Looking back to the starting point.
The Master Bedroom
"HER" Room (Bells)
The tunnel the footprints lead players through at the end of the hallway.
The ladder at the end of the tunnel.
The room at the bottom of the ladder.
A long staircase leading deeper underground with long strings spanning the walls.
The long walk down the stairs.
The door at the end of the long staircase.
Entering the door and turning left, a figure can be seen down the hallway of doors.
Leaving the hallway of doors.
Entering a large space with a Instrument disk ahead and tunnel underneath.
The large space with the Instrument disk and construction area with working Sleepers across the pit.
The Instrument disk.
The message seen when closing your eyes near the console, "You need the card to access this. Follow the trail."
The Instrument disk console.
Climbing down the ladder, the view from underneath the Instrument disk.
The tunnel ahead.
The ladder (left) and tunnel entrance (right) around the curve.
Looking down one of the passages, an ominous Red Door is faintly visible.
The first message on the wall, reading "I left you something".
Following the footsteps, a message off in the distance reads "Over here".
Another message on the ground says "Open your eyes".
The Sleeper where the footsteps lead.
Bells subduing the Sleeper.
The lockpick, to the left of the Sleeper's original spot.
The subdued Sleeper on the ground. The Sleeper remains like this only for a few seconds.
The Sleeper returns to sweeping up the trash.
From the Sleeper with the lockpick, bear left, to reach the locked door.
The locked door where the lockpick is used.
The room behind the locked door.
The room behind the locked door.
The massive red pit in the center of the room.
The locked door
Looking across the arch with the door ahead.
The room Bells falls into when landing on the foam.
The entrance to the room (top left) and the locked door (center).
Approaching the Sleeper
The working Sleeper, wearing headphones
The entrance to the metal sphere
Inside the metal sphere.
The pile of boxes and papers inside the metal sphere.
The page to record with the code, 1138.
Going to the locked door and entering the code.
Back in the main room with the pit, unlocking the second door to get the keycard.
The room behind the 2nd unlocked door.
The Red Door in the room.
A Sleeper patrolling the room.
A Sleeper patrolling the room.
A patrolling Sleeper and one inside the hut.
The next room where a Lucid is playing on an Instrument Console. Red carpet on the side of the room is in shadow.
The Lucid with the keycard, commonly referred by the community as "DJ Lucid".
"DJ Lucid" at work.
Sneaking up behind the Lucid to steal the keycard on held on its waist.
Leaving the room with the Lucid.
A patrolling Sleeper and one inside the hut.
A patrolling Sleeper and one inside the hut.
With the keycard, climb back up the ladder
Using the keycard, the cover over the Instrument disk lowers.
Jumping onto the Instrument disk cover.
On the rafters, head to the opposite side and jump down.
The area across from the Instrument disk console, still under construction.
Looking back towards the Instrument disk.
The area still under construction.
Sleepers in the construction area.
After kicking in the door, Bells is dragged.
Being dragged to the Red Door.
The glowing trash piles while being dragged closer to the Red Door.
After escaping, climb up the ladder ahead.
Atop the ladder, a bandage can be picked up.
Climbing up the dark tunnel.
Coming out of the tunnel, seeing dozens of Sleepers playing discordant music on strings across a large pit.
Closing her eyes near the bridge, a message appears saying Bells will need a disguise - only Sleepers cross the bridge.
Looking away from the Sleepers playing the strings, a rope bridge spans a massive pit and leads to a small door.
The door across the rope bridge.
Looking back across the bridge to the Sleepers.
Looking back across the bridge to the Sleepers.
Across the bridge, a small locker room.
An open locker with a Sleeper outfit.
The view after donning the Sleeper outfit - eyes are forced closed, but arrows lead where to go.
Heading back to the bridge, X's warn not to walk that direction.
A message telling you to wait for the bridge to rise.
Crossing the bridge to join the Sleepers playing the strings. The faint glow on the left is the Red Door.
Bells' eyes open up as her parents (as Sleepers) grab her.
Bells' eyes open up as her parents (as Sleepers) grab her.
Her parents hold Bells facing the Red Door.
The Red Door opens and the Shape emerges.
The Shape emerges from the Red Door.
Bells has no choice but to run down the hallway ahead.
Bells' parents and the other Sleepers kneel as the Shape begins to chase Bells.
At the end of the hallway is a large room with moving strings and ledges ahead.
Bells drops into another tunnel after escaping the Shape.
The tunnel Bells drops into.
The elevator at the end of the tunnel.
The elevator buttons.
At the top of the elevator shaft, the tunnel turns left.
A side area off the main tunnel.
A Grappling Hook at the bottom of the well.
Looking up the well.
Throwing the Grappling Hoop.
Throwing the Grappling Hook up the well, the rope drops for Bells to climb.
Looking out from the top of the well.
The well Bells climbs up.
The Hideout, shining flashlights so Bells knows where to go.
Approaching the Hideout.
Bells, grabbed and dragged away from the Hideout.
The New Kid watching a video in the Hideout with Dax and Gwen discussing Bells.
Dax and Gwen speaking to the New Kid.


